

How to use Git and GitHub for Versioning
How to use Git and GitHub for Versioning
Edition #12

Hey, I'm Marco and welcome to my newsletter!
As a software engineer, I created this newsletter to share my first-hand knowledge of the development world. Each topic we will explore will provide valuable insights, with the goal of inspiring and helping all of you on your journey.
In this episode I want to show you how I use Git and GitHub for code versioning, I will show you the steps I take when I need to create a feature such as a new API.
In this post, I included the shortcuts of Git commands (aliases) that I've set up in my .gitconfig file. These are handy because they make it quicker and easier to execute common Git commands. Feel free to use them yourself!
🔄 Git
Git is a version control system, which is a way to keep track of changes made to files within a project. It is very useful when working on a project with other people, because it allows you to coordinate and combine changes made by different people seamlessly.
Imagine working on a document with a friend: you might change some parts, while your friend might change other parts. When you are both finished working, you will need to combine your changes into a single document. Git helps you do exactly that, ensuring that the changes are integrated properly and that there are no conflicts.
One of the best things about Git is that it allows you to keep track of all the changes you make over time. So if you make a mistake or want to go back to a previous version of the project, you can easily do so.
Git has a number of commands and features, but you can start using it with just a few basic operations.
How to work in multiple people with branches
One of the basics of Git is the concept of branches, it is a separate copy of your project where you can experiment or work on new features without affecting the main project. Once you have finished working on your branch and are satisfied with your changes, you can merge your work with the main project.
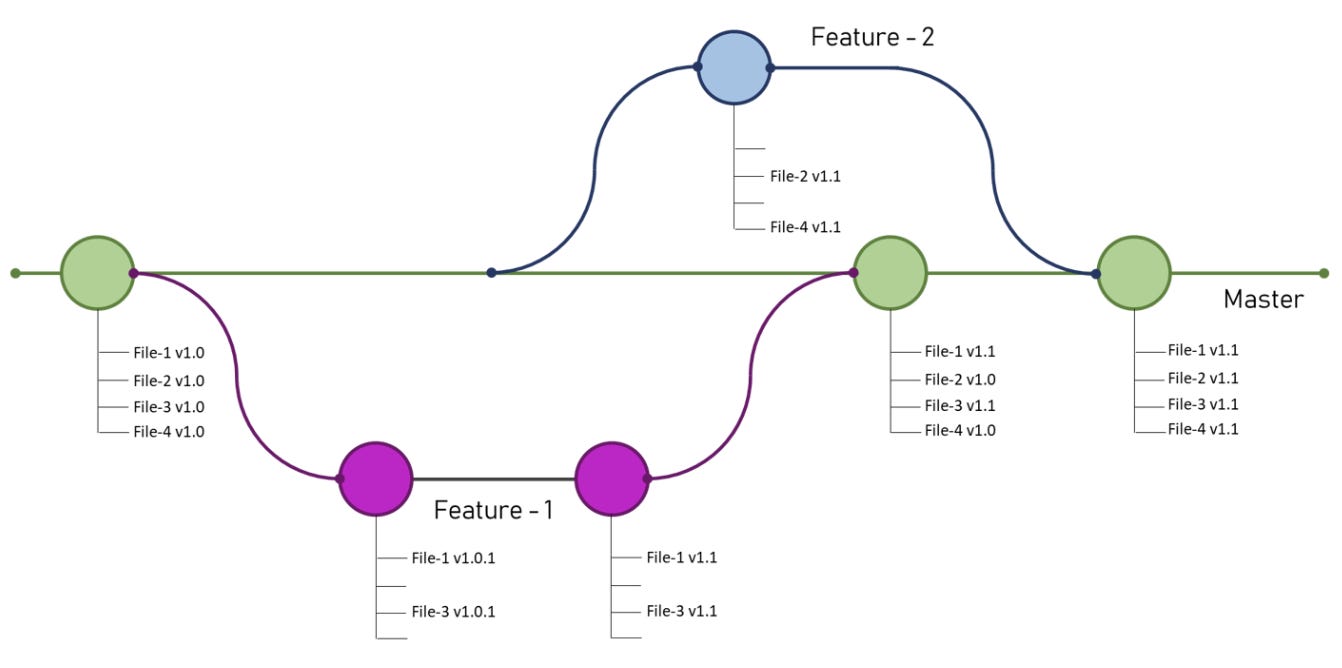
In the image we can see the use case of two people working on the project, we have the Master branch which is the main branch of the application, used to maintain the latest version of the project.
The two people want to make changes, they create two branches, respectively Feature - 1 and Feature - 2 where they apply the changes to different files:
Feature - 1: edit File-1 and File-3
Feature - 2: edit File-2 and File-4
when they are finished they merge these changes with the Master branch, the result will be that the Master branch will be updated with all the changes made by both branches.
How to make changes: Commit
Commit in Git are like snapshots of a specific state of the files in your repository. When you have changed a file or added new files and want to save those changes, you make a commit. Think of a commit as a checkpoint or snapshot of your files at a certain point in time.
🐙 GitHub
GitHub is a platform that offers several services and tools to help programmers work together. Here you can upload code for your project (such as code for a website or application) and collaborate with other people. When you make a change to the code and upload it to GitHub, other people working on the same project can see the changes and collaborate on them.
GitHub has several features that allow you to keep track of who did what, allow programmers to work on different versions of the same code without problems, and resolve conflicts between different versions of the code.

Git vs GitHub
Git is a tool that manages the versioning of code, allows you to make backups and keep track of various versions.
GitHub is a web platform that allows you to use this tool more easily and share code with other people.
Pull request
The pull request is a Github concept that allows you to integrate a set of changes (usually represented as a group of commits) from your development branch to another branch — usually the main branch of the project (master or main). It is a common practice to collaborate, share and discuss changes before officially integrating them into the main project.
Pull requests are used to:
Request a review of changes: You can request other project collaborators to look over your work, make corrections, or make suggestions.
Incorporate changes: Once the changes have been reviewed and approved, the project owner (or another member with permissions) can accept the pull request, which incorporates the changes into the target (usually master/main) branch of the project.
Documentation and tracking: Pull requests record the history of the changes, along with the comments, discussions, and decisions that accompanied them. This makes it easier to understand the path the changes took before being integrated into the master branch of the project.
📟 Basic Git commands
Git has a variety of commands, ranging from basic operations to more intricate ones like rebase. For everyday use, we only need to know a few of these commands, which are:
git init: Initialize a new git repository in an existing directory or create a new directory for a new repository.
git clone: Clones an existing repository from a remote URL into the specified local directory.
git branch: Shows the list of local branches and reports the active branch.
git pull: Updates the current branch by downloading the latest changes pushed by people from the remote repository.
git checkout [branch|file]: allows us to move to another branch or restores the specified file.
git status: Shows the status of the working directory and staging area.
git diff: Show changes not yet staged with “git add“ command.
git add [file(s)]: Adds one or more files to the staging area for commit.
git commit -m "commit message": Records changes to the files indicated in the staging area with an associated commit message.
git push origin [branch]: Sends local commits to the specified branch in the remote repository.
git merge [branch]: Merges changes from the specified branch into the current branch.
git log: Shows the history of commits.
git revert [commit]: Undo an existing commit by creating a new commit.
My Git commands aliases
If you find yourself frequently typing out long Git commands, you can save time by creating shortcuts, or "aliases." These aliases are simple nicknames for longer commands that you can configure to your liking.
The configuration is done in the .gitconfig file, usually located in the root folder of your OS. Below you can find my .gitconfig file, where I've defined some aliases that I find useful:
[alias]
    s = status
    ci = commit -m
    co = checkout
    b = branch
    unstage = reset HEAD --
    last = log -1 HEAD
    lg = log --color --graph --pretty=format:'%Cred%h%Creset -%C(yellow)%d%Creset %s %Cgreen(%cr) %C(bold blue)<%an>%Creset' --abbrev-commit --
    # Get the current branch name (not so useful in itself, but used in
    # other aliases)
    branch-name = "!git rev-parse --abbrev-ref HEAD"
    # Push the current branch to the remote "origin", and set it to track
    # the upstream branch
    publish = "!git push -u origin $(git branch-name)"
[user]
	email = marcomoauro@hotmail.it
	name = Marco Moauro
[init]
	defaultBranch = main
for example you can write:
co: instead of "checkout"
b: instead of "branch"
s: instead of "status"
ci: instead of "commit -m"
…
It took me a month to learn to stop typing "-m" in "commit -m" by using the alias "ci" 😁
👨💻 Let's get down to practice
You can download all the code shown directly from my Github repository: https://github.com/marcomoauro/node-backend-template
Now I'll show you how to use the Git commands we talked about to add a new feature. We'll build a new API that returns a fixed message.
Let's start with the backend template for Node.js that I showed in this post:

Pull
Let's start by doing a "pull" to bring in any new changes that others may have added to the main branch. It's a good practice to do this regularly.
git pullCreate new branch
Now let's create a new branch. I usually start with fix/ or feature/ as a prefix:
git co -b feature/new-apiLet's implement the changes
We'll define a new route /ping. When invoked, it will call a new module that will respond with the message "pong".
let's create the new file src/api/pong.js:
export const pong = () => {
  return {
    message: 'pong'
  };
};
And now let's make the first commit! It's a good practice to create commits that focus on specific changes:
git add .
git ci "create pong module"
Let's define the new api in router.js:
import {pong} from "./api/pong.js";

router.get('/ping', routeToFunction(pong));
and let's make a new commit:
git add .
git ci "create new api"
At this point, we can update the remote branch by doing a push. We can use this command which leverages the alias:
git publishCreate pull request and merge
We have the branch with the changes ready to merge with the main branch. We proceed by creating the pull request from the GitHub interface:
We navigate to the Pull Requests tab of the repository.
Click on “Compare & pull request“.

press on "Create pull request":

Pull request created! If we refresh the tab we will find a pull request available:

By clicking on it and opening the "Files changed" tab, we can see all the changes made. This part is useful for the reviewer to suggest changes and leave comments.

Once we're satisfied, we can navigate to the "Conversation" tab to merge them with the main branch.
Scroll down and select "Squash and merge". After that, confirm the action:

This process will create a single new commit on the main branch that includes the changes made in the pull request.

These changes will only be reflected in the remote branch. To update our local version, we can do the following:
git co main
git pull
and finally we can delete the feature branch from our pc:
git b -D feature/new-apiHeroku
Having connected the GitHub project to Heroku, the changes made through the pull request will be instantly visible on the deployed service.
You can test the new API here: https://node-backend-template-0a553f134efa.herokuapp.com/ping
If you're interested in deploying the service on Heroku as well, you can refer to this post for a step-by-step guide on how to do it:

And that’s it for today! If you are finding this newsletter valuable, consider doing any of these:
🍻 Read with your friends — Implementing lives thanks to word of mouth. Share the article with someone who would like it.
📣 Provide your feedback — We welcome your thoughts! Please share your opinions or suggestions for improving the newsletter, your input helps us adapt the content to your tastes.
💬 Chat with me — If you have any doubts or curiosity, please write to me, I will be happy to answer you!
I wish you a great day! ☀️
Marco
I mean, Github's not open source itself, which is very hypocrit.